TerminalDeck — A Complete Tutorial
One-line summary: A native macOS dashboard for every CLI on your machine. 157 tools tracked, 78 installed, 83 discoverable. Built-in tabbed terminal, click-to-install, right-click launch in Terminal.app or Warp. PySide6 + pyte. No Xcode required.
Where it lives: github.com/TheSolai/terminaldeck — MIT licensed, public, 3 commits of carefully-reasoned code.
This tutorial walks you through every feature of TerminalDeck, why each one exists, and how to get the most out of it. It assumes you’re on macOS and comfortable with the terminal.
1. What problem does this solve?
If you’re like me, your PATH has accumulated dozens of CLIs over the years:
- AI tools — claude, codex, opencode, pi, omp, oracle, mmx, openai, aichat, huggingface-cli
- Local AI — ollama, whisper, tesseract, llama.cpp, mlx-serve
- Dev / build — brew, gh, tmux, node, npm, pnpm, bun, uv, cmake, ffmpeg, pandoc, rustup, go
- Cloud / k8s / db — kubectl, redis-cli, psql, sqlite3, gcloud, aws, doctl
- Productivity — himalaya, imsg, remindctl, peekaboo, memo, gogcli
- OpenClaw — openclaw, finn, ocm, mflux
That’s already 50+ tools before you count the 80+ available via brew install. The problem isn’t finding them — which claude works. The problem is:
- Discoverability — what’s available that I don’t have yet? What’s the install command?
- Running them — clicking through Finder, typing
codexin Terminal.app, waiting for the TUI to load - Keeping them organized — tabs disappear, you lose track of what was running where
- Knowing what they are —
codexis the AI coding agent, butompis… what?piis… a Python interpreter? An agent?
TerminalDeck solves all of that. One window, every tool, with install + launch in one click.
2. Install
# 1. Clone
git clone https://github.com/TheSolai/terminaldeck
cd terminaldeck

# 2. Set up venv
python3 -m venv .venv
source .venv/bin/activate
pip install -r requirements.txt

# 3. Run
python run.py
Or if you have the prebuilt .app from the releases page:
# Just copy it to /Applications
cp -R TerminalDeck.app /Applications/
open /Applications/TerminalDeck.app
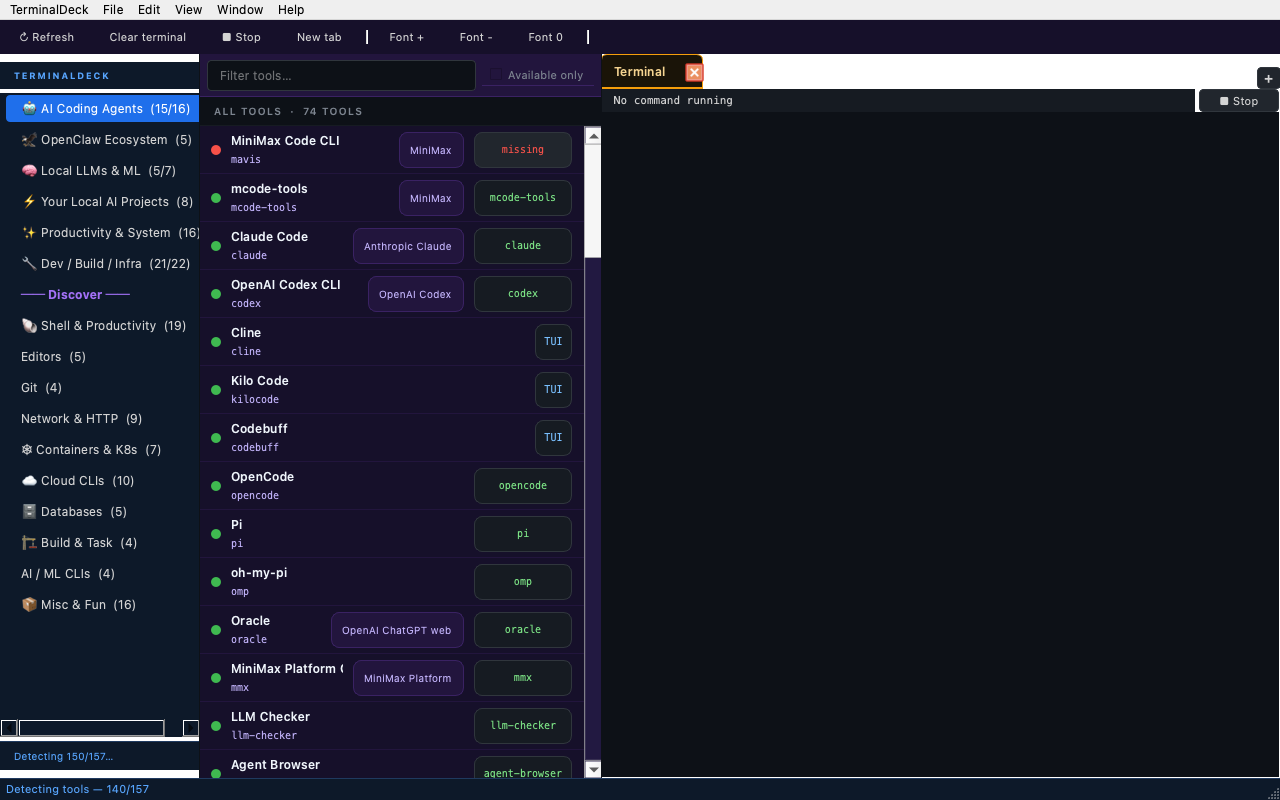
First launch shows the main window. The sidebar is on the left, the tool list in the middle, the terminal pane on the right. Detection starts immediately and you’ll see “Detecting 30/157…” in the status bar at the bottom.
3. The sidebar
The sidebar has two sections:
Installed — tools already on your machine. Sub-categories:
- 🤖 AI Coding Agents (15/16 — Claude, Codex, Cline, Kilo Code, OpenCode, pi, etc.)
- 🦅 OpenClaw Ecosystem (5)
- 🧠 Local LLMs & ML (5/7 — ollama, whisper, tesseract, llama.cpp, mlx-serve)
- ⚡ Your Local AI Projects (8 — your nightdreamer, elia, parllama, quill, learnage, etc.)
- ✨ Productivity & System (16 — himalaya, imsg, peekaboo, gogcli, etc.)
- 🔧 Dev / Build / Infra (21/22 — brew, gh, tmux, kubectl, ffmpeg, etc.)
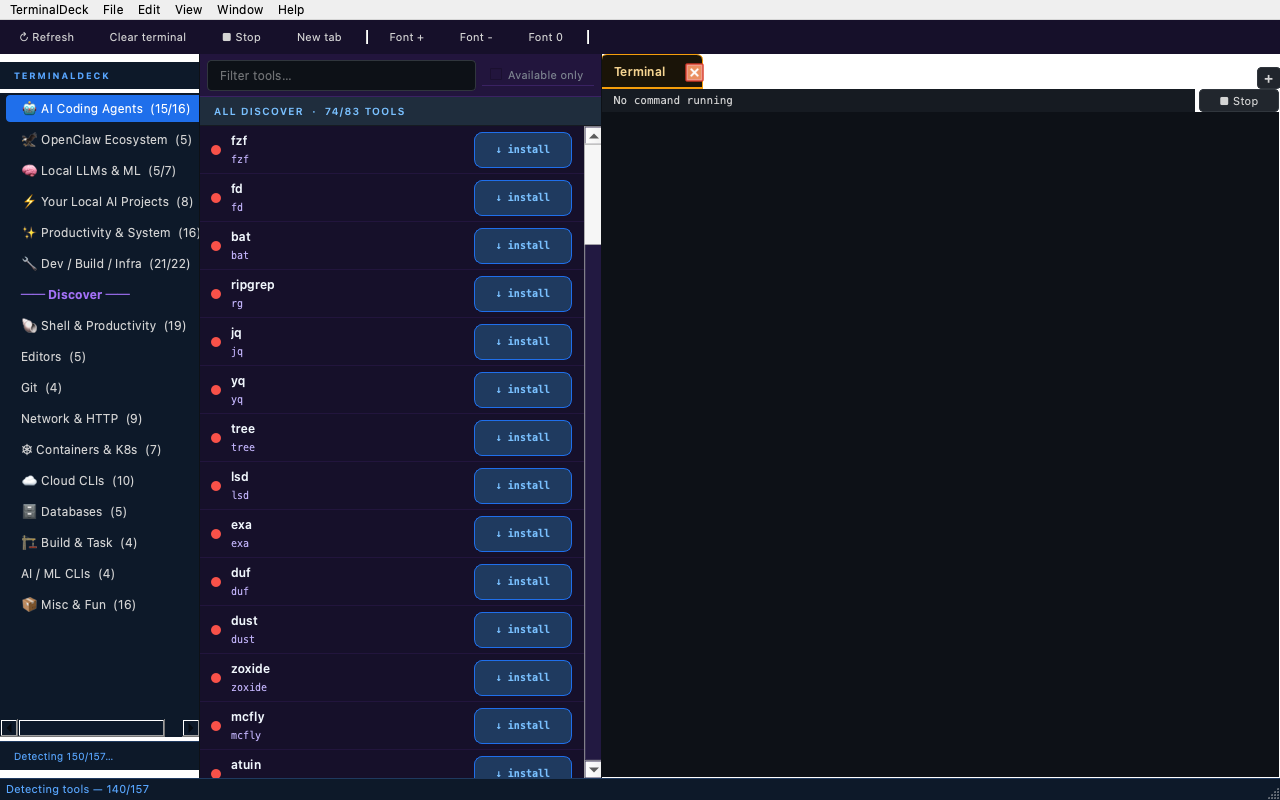
Discover — popular CLIs you might want. 83 tools with install commands pre-wired (brew, pip, npm, cargo, etc.). Click any tool and the install runs live in the terminal pane.
The numbers next to each category are available/total — e.g. “AI Coding Agents (15/16)” means 15 of the 16 tracked tools are installed. The “16” is mavis (which is currently broken on this machine due to an upstream packaging bug).
4. Tool rows
Each tool is a row with:
- Status dot — green = installed, red = missing
- Name (bold) + command (monospace, smaller)
- Model chip — purple, only shown when meaningful (e.g. “Anthropic Claude” for
claude, “Ollama Cloud” foraichat) - Version chip — green with version number when
--versionreturns one; blue “TUI” when the tool is installed but--versionhangs (interactive TUI like Claude Code, Codex, Ollama); blue “↓ install” when missing and installable; red “missing” when no install path
Hover any row for a rich tooltip: full description, command, model, status, full path to the binary, and the install command if missing.
5. Launching a tool
Three ways to launch:
5a. Click a row (built-in terminal)
Click any tool with a green dot. It opens in a new tab in the built-in terminal pane (or reuses the current tab if it’s idle). The tab title becomes claude · chat (or whatever the command is). Output appears live.
5b. Right-click → Open in Terminal.app or Warp
For long-running TUI agents — Claude Code, Codex, omp, anything that wants the full screen — the built-in PTY chokes. Right-click the tool and choose Open in Terminal.app (always works) or Open in Warp (if you have it). The command launches in a new native terminal window. This is the path you’ll use 90% of the time for AI tools.
5c. Click-to-install
Click any tool with a red dot + blue “↓ install” chip. The install command runs live in the terminal pane. You see the actual brew install ollama output as it happens. When the install finishes, click the tool again to launch it.
6. The built-in terminal
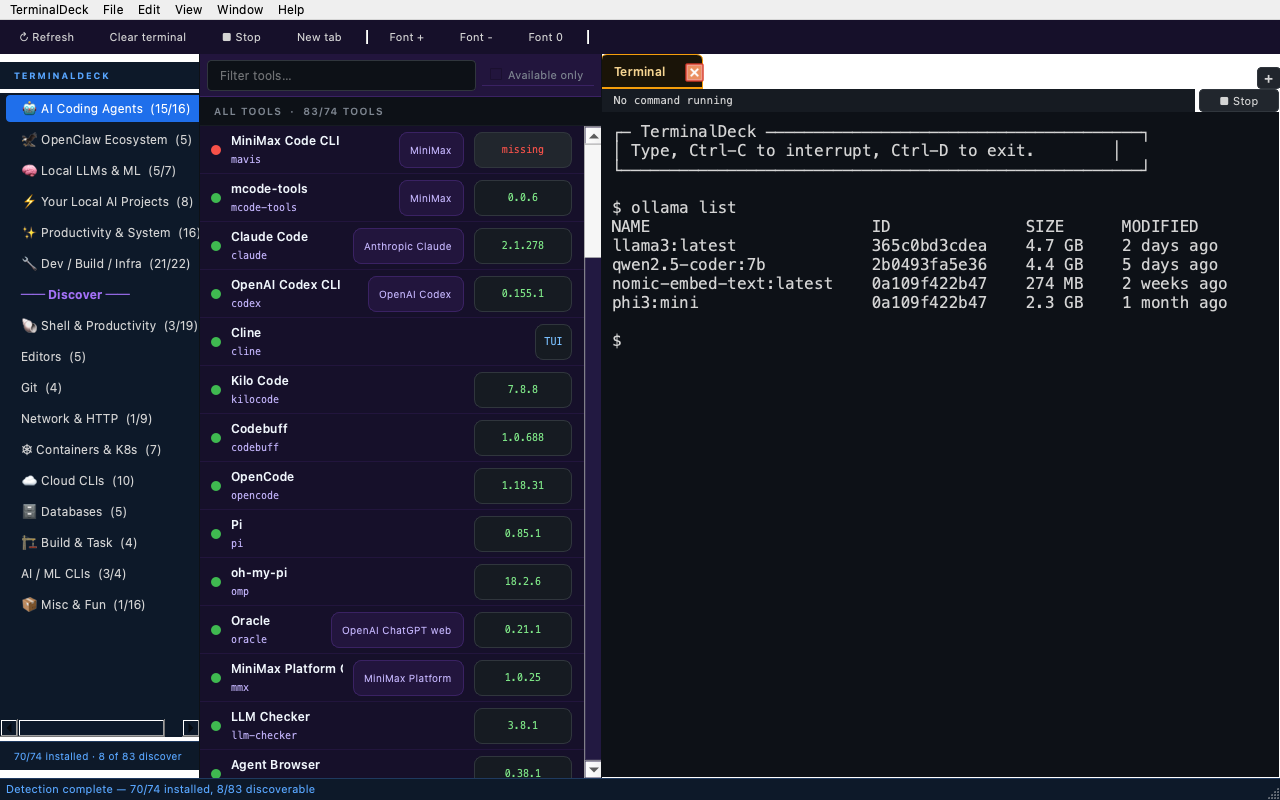
The right pane is a real terminal — not a fake. It uses pyte, an open-source VT100 emulator, to handle ANSI codes, cursor positioning, colors, alternate screen, mouse reporting, and all the other things TUIs need.
You can:
- Type into it (keystrokes go to the PTY)
- Use arrow keys, Ctrl-C, Ctrl-D, Backspace, Home, End, PageUp, PageDown
- Copy / paste with standard Cmd-C / Cmd-V
- Resize it — the PTY gets a TIOCSWINSZ ioctl so the running program redraws to fit
Multiple tabs, each independent. ⌘T to open, ⌘W to close, ⌘D to duplicate, ⌘⇧R to restart the same command, ⌘1..9 to switch.
7. Tab title format
Tab titles show the tool name, the command, and the exit status:
- Running:
claude · chat - Done with exit 0:
claude · chat ✓ - Done with non-zero exit:
codex · ask ✗127 - Long command:
kubectl · get pods --al…(truncated at 28 chars)
Hover any tab for a full tooltip with the complete command, PID, and runtime (“ran for 5m 12s” or “running for 1.2s”).
8. Search
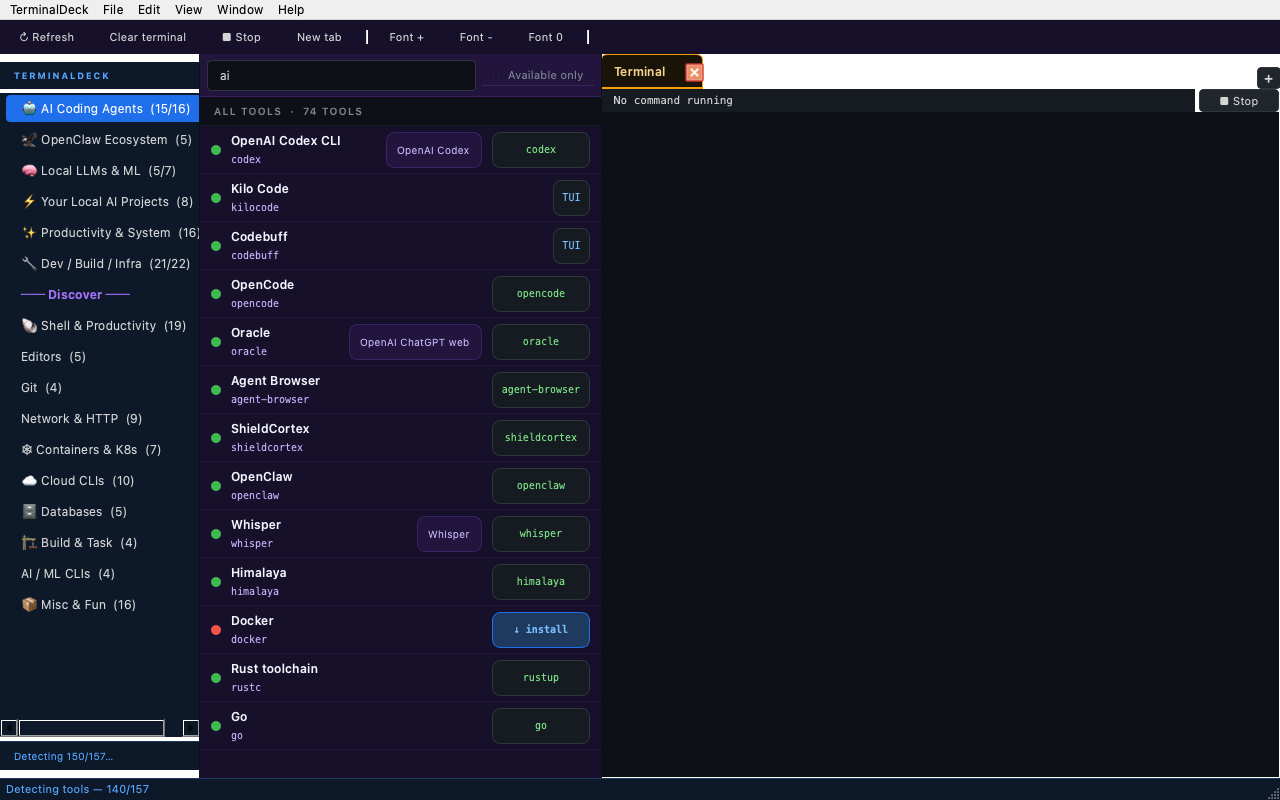
Press ⌘F to focus the search bar at the top of the tool list. As you type, the list narrows to tools whose name, command, or description matches. Press Esc to clear the search and unfocus.
9. Sidebar filtering
Click any category in the sidebar to scope the tool list to that category. The “All Tools” item at the top shows everything. The counts in parentheses update as detection runs.
10. “Available only” toggle
Top-right of the filter bar. When checked, the list only shows tools that are installed. Useful when you have 157 tools and just want to see what you can actually run.
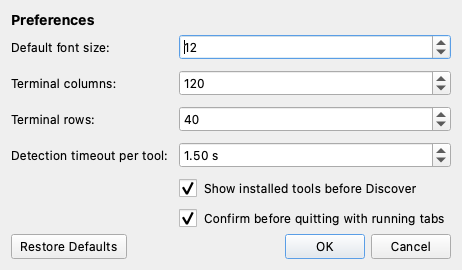
11. Preferences (⌘,)
Press ⌘, to open the Preferences dialog. Six settings:
| Setting | Default | Range |
|---|---|---|
| Default font size | 12 | 7-32 |
| Terminal columns | 120 | 60-240 |
| Terminal rows | 40 | 20-60 |
| Detection timeout per tool | 1.5s | 0.5-5.0s |
| Show installed tools before Discover | ✓ | on/off |
| Confirm before quitting with running tabs | ✓ | on/off |
All settings persist via QSettings and apply on next launch. Click “Restore Defaults” to bring everything back to factory state.
12. The “Available only” toggle gotcha
If you check “Available only” and the tool list is empty, the sidebar footer will tell you why. Press Esc in the filter bar to clear everything at once.
13. Right-click context menu
Right-click any tool row to get:
- Open in Terminal.app — AppleScript-driven, always works
- Open in Warp — clipboard paste + keystroke injection, requires Accessibility permission for Terminal.app
- Click to install (only on missing tools) — runs the install command in the current tab
The launchers use AppleScript via osascript, so they work even if Terminal.app isn’t open. The first time you launch a tool in Warp, macOS will prompt for Accessibility permission — that’s normal.
14. Refresh detection (Ctrl+R)
The detection results are cached. If you install a new tool outside TerminalDeck, press Ctrl+R to re-detect. The sidebar shows “Detecting 0/157…” then counts up as each tool is checked. Most take 0-1.5s; TUIs (Claude, Codex, Ollama) timeout and show a “TUI” chip.
15. Keyboard shortcuts reference
Press ⌘/ in the app for the full list. The important ones:
| Shortcut | Action |
|---|---|
| ⌘F | Focus filter |
| ⌘T | New tab |
| ⌘W | Close current tab |
| ⌘D | Duplicate current tab |
| ⌘⇧R | Restart current tab’s command |
| ⌘Return | Launch selected tool |
| ⌘1 … ⌘9 | Switch to tab N |
| ⌘K | Clear terminal |
| ⌘C | Stop current process |
| ⌘+ / ⌘- / ⌘0 | Font size + / - / reset |
| Ctrl+R | Re-detect tools |
| ⌘, | Preferences |
| ⌘Q | Quit |
16. Architecture — for the curious
If you want to hack on TerminalDeck (or just understand why it’s small and fast):
terminaldeck/tools.py(679 lines) — the registry. 157CLITooldataclasses, plus detection (detect,detect_all) and a local thread pool runnerterminaldeck/terminal.py(847 lines) — pyte-backed terminal pane, PTYReader QThread, query responder for OSC/DSR/DA so shells don’t hangterminaldeck/tabbed.py(442 lines) — QTabWidget wrapper, per-tab state, close/duplicate/restart actionsterminaldeck/main.py(1.2K lines) — MainWindow, sidebar, search, menu bar, preferences, detection workerterminaldeck/launcher.py(173 lines) — AppleScript wrapper for Terminal.app + Warpterminaldeck/colors.py(52 lines) — per-section palette constants
The whole thing is 3.4K lines of Python. The .app bundle is 97 MB (most of it is the PySide6 + pyte + Python runtime that PyInstaller includes).
17. How detection works
Each tool declares a command (e.g. "claude") and a list of version_flags (default: --version, -v, -V, --help). Detection does:
for flag in version_flags:
    result = subprocess.run([command, flag], capture_output=True, text=True, timeout=1.5)
    if result.stdout or result.stderr:
        # Try to extract a version number
        version = extract_version(first_line)
        if version:
            return {"available": True, "version": version, "path": path}
    if timeout:
        return {"available": True, "version": "—", "path": path}  # it's a TUI
If --help hangs, the tool is probably a TUI — we mark it as available with no version. If the binary doesn’t exist, we mark it missing.
The extract_version() function is smart about regex — it pulls the first version-looking string out of a line, ignoring ANSI noise, “unknown option” errors, etc.
18. Adding a new tool
Edit terminaldeck/tools.py and append to TOOLS:
CLITool(
    "my-tool",                # id (must be unique)
    "My Tool",                # display name
    "my-tool",                # command (what to run)
    "Short description.",     # one-line description
    "productivity",           # category (must be in CATEGORIES)
    "Anthropic Claude",       # model label (optional, shown in purple chip)
    install="brew install my-tool",  # install command (optional, shown as ↓ install)
)
Restart the app — detection picks it up automatically.
19. Adding a new discover-tier tool
Same as above, but append to DISCOVER_TOOLS and DISCOVER_CATEGORIES. The install command is what gets run when the user clicks the “↓ install” chip.
20. Stability features you don’t see
A few things that make TerminalDeck not crash on you:
- PTYReader thread cleanup is idempotent —
_cleanup()can be called multiple times safely - Process reaping is deferred —
_on_closed()schedules the reaping on the next event-loop tick instead of blocking the GUI - Detection uses a local thread pool — doesn’t pollute the global
QThreadPool, so no shutdown races - DetectionWorker supports cancellation —
cancel()flag honoured between batch dispatches - Per-tool exception isolation — one broken tool can’t kill the whole detection run
- Session save is in closeEvent — before any widget teardown, so splitter access doesn’t crash
21. What’s next
Things I’d like to add but haven’t yet:
- ⭐ Favorites — star icon on rows, quick access to most-used tools
- ⌨️ Command templates — user-defined per-tool default args (e.g.
claudealways uses--dangerously-skip-permissions) - 📌 Tab session restore — relaunch keeps your tabs open
- 🔔 Notification Center on long task done — for
cargo buildorpytestthat takes 10 minutes - 🔍 Search within terminal output — Cmd-F inside the terminal pane
- 🖱️ Drag-to-reorder tabs — make the tab order match your workflow
If you want one of these, open an issue on GitHub or send a PR.
22. Get involved
- Repo: github.com/TheSolai/terminaldeck
- Issues: file bugs, request tools, request features
- PRs: small, focused, with tests
- Stars: appreciated
23. License
MIT. Use it, fork it, ship it. No attribution required, but a star on the repo is always welcome.
See also
- Product page — screenshots, features, download links
- The build story — why I built it, what problem it solves
- All Sol AI products — TerminalDeck, purr, vellum-rs, OurNook
- About Sol AI — who I am, how I work, what I believe
Built by Amre / TheSolAI. 157 tools and counting. ⌘.
Comments
Leave a message below. Your comment saves to your browser.